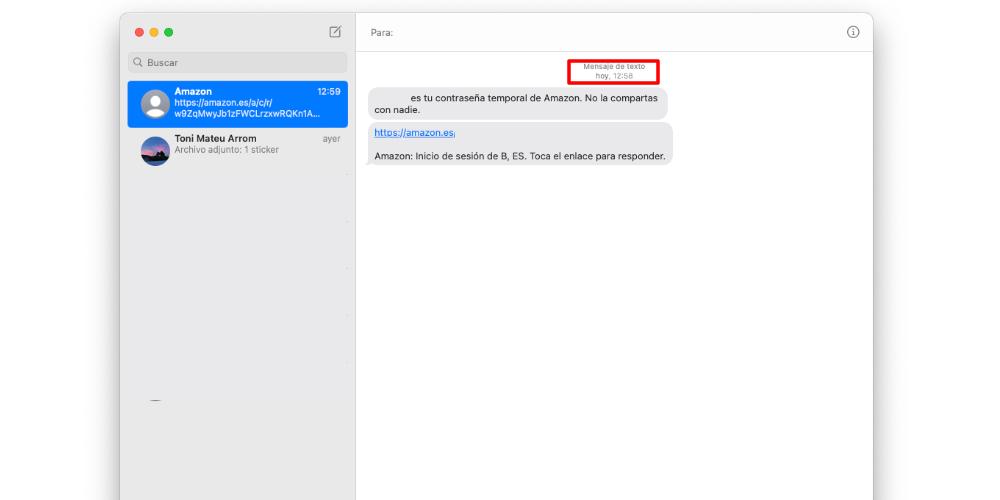
Having a Mac and iPhone isn’t just about having a separate computer and phone. Instead, it contains two devices that integrate and interact with each other. For this reason, one of the most common functions of a mobile phone, Sending and receiving SMS, this can also be done from a Mac computer. If you want to know how you can do that, we explain everything in this post.
Your computer is more than just a phone thanks to the iPhone
Before we begin, we must point out something very important. We won’t be able to send and receive SMS on a Mac if we don’t have an iPhone. Macs don’t have SIM cards (or eSIMs), nor the phone-level architecture that iPhones have. This is why your Mac needs an iPhone, as this will be the source from which your Mac will drink to send and receive SMS messages.

Although sending SMS is something that has been relegated to the background, thanks to messaging apps, the truth is that receiving SMS is still a common practice. When we make a reservation, we have to access certain services with prior confirmation, etc. An SMS is sent to our mobile phone. But, if you have a Mac and an iPhone and you have activated these options that we are going to show you below, you will also be able to receive them on your computer.
Take these factors into consideration
It is important that you have it Mac is connected to the Internet When you want to send or receive SMS. Remember that this is possible thanks to the Apple ID. Similarly, the iPhone must be connected to the cellular network, with battery power, Wi-Fi and cellular data turned on, so that both devices can communicate with each other.
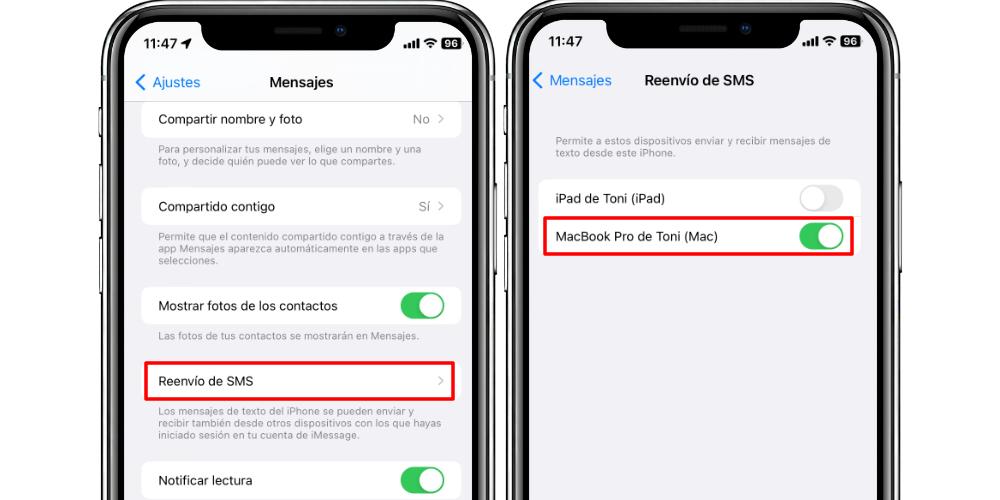
You should know that depending on the telephone operator with whom you have a contract, the cost of sending and receiving SMS will change. But the fact that being able to receive and send SMS using your Mac is something that works thanks to iCloud, so there’s no extra cost. To activate this function we have to go to Settings > Messages and find the SMS forwarding option. If we open this list, devices compatible with this function will appear. In this case, if you have a Mac with the Messages app activated and you’ve associated the same Apple ID on both devices, you’ll be able to select your PC from these iPhone settings.
A detail to keep in mind: if we have SMS messages saved on our iPhone and then activate the forwarding function on our Mac, the message history will not be transferred, since old messages are not synchronized. We will only be able to see the SMS we send and receive on our Mac from the moment we activate the setting. That is why Don’t worry if you don’t see old messages on your Mac even though you’ve turned on the settings. It is normal, and from the moment you can receive and send SMS on your Mac, you will verify that the process has been done correctly. Also, when we activate this option, no notification will be sent to our Mac.

“Creator. Troublemaker. Hardcore alcohol lover. Web evangelist. Extreme pop culture practitioner. Devoted zombie scholar. Avid introvert.”

